Thursday, September 29, 2011

Dallas Cowboys Cake

So, I finally got my first paying gig. Actually, I take that back.  I was hired to do a gig at Aidan's birthday party but not until October 15th.  This one came up and I have been paid for it, so I guess it's the first cake I've ever gotten paid to do. :)

A coworker saw some of my work and asked me to do a Dallas Cowboys cake for her son.  She pretty much gave me creative free reign - so I did a bit of research and since she wanted an 8 inch round, I decided simple was best.  

I intended to do the Cowboys actual logo in the font, but in the end, I ran out of time.  I knew getting those cookie cutters would make me lazy, but I don't think it detracted from the cake.  This was also my first time working with floral wire and I must say - it was a breeze.  Basically, I just cut out two star shapes for each decorative element and sandwiched them together with the wire in between.  I used a bit of water on a paintbrush to help them stick together. The football is made of chocolate fondant, which tastes just like tootsie rolls, and white fondant accents.

This was my first full assembly -


At this point I realized that I didn't have enough room to write "Happy Birthday Tyrone" on the cake board in front of the cake.  But then - I noticed that I had six stars and that there are exactly six letters in his name. Poifect!  I also needed to somehow show that he was turning 44.  So, after some additional work -


Here are a few additional views


I must say, this cake caused the least anxiety out of all the cakes I've made.  It's also the smoothest fondant free cake I've ever done.  The secret - I found a stainless steel scraper/dough cutter/food chopper at Ross for 2.99.  It's slightly beveled and works like a charm on smoothing the sides.  I also chilled the cake for about 5 minutes then took it back out, pressed wax paper to the sides and went over it again with the scraper - right on top of the wax paper.  It worked out well.

Monday, September 19, 2011

Aidan's First Birthday

My baby boy turned a year old on Saturday.  Since I began decorating, I knew that I would definitely be making his birthday cake and that it would definitely be a two-tiered creation.  I planned this cake for several weeks - did sketches, watched videos, got advice from decorating friends, etc etc.

His theme was owls.  I decided to create a fondant owl topper and other fondant decorations, but would buttercream both layers instead of covering in fondant.  I wanted to do fondant feathers, but figured I might have to hand cut each one.  There was no way I'd have time to do it.  Instead, I bought a leaf cutter and drew lines on each to make it look more feathery.

I also did his name using cookie cutters.  I was going to either freehand his name or use a homemade stencil, but didn't have time.

Made his owl topper, name and feather decorations 2 days in advance to give them time to dry.


The smash cake was made with mini cake pans - 4 inch rounds


And here is the final result.  I couldn't get the buttercream finish as smooth as I wanted it.  But I now know that the icing should have bit a bit thinner in consistency and I should have put much more on the cake.  I also wasn't completely pleased with the color - really wanted a lighter blue.  But overall, I think it came out pretty well for my first attempt at a two tier.


Sunday, September 18, 2011

All You Need is Cake

My brother Jim is a huge Beatles fan.  And so, for his 32nd birthday, I decided to bake him a Beatles birthday cake.  After a bit of internet research, I stumbled across an image of a cake that I really liked - simple, clean, modern, yet pretty impressive looking.  So, I decided to tackle it.  And boy was it something that needed to be "tackled."

The process took nearly a week.  I drew the stencil in Adobe Illustrator, printed on cardstock, cut with an exacto and then put onto black fondant and cut out.  I let the faces dry for two days.  The logo nameplate was done with fondant and edible marker - I used a template for that as well, which I cut out of cardstock.  Other elements are fondant cut with cookie cutters. The "frames" were the most arduous of everything.  They started out too thick, broke like crazy, etc, etc. But in the end, with the help of my mom who was in town, we got them on the cake.

The cake board decoration is actually cup cake cups cut in half and glued to the (terribly messy looking) cake board.  (I'm such a sloppy crumb coater and the board wasn't grease proof.)

This was my first big cake covered in fondant.  I don't know what possessed me to attempt a square cake for the first fondant covering, but let me just say that it is NOT easy.  And that the fondant elements in the corners are very, very strategically placed.

Overall, I think it came out quite well.  Although it's been funny asking people what they see when they first look at the image on top.

Funniest comment yet - "Ummm - a buffalo? NO! Wait! I see John Lennon!"


Wednesday, August 24, 2011

Pink Velvet Romantic Ruffle Cake

On Saturday morning as I lay in bed wondering what I could get my boss for her birthday, it suddenly dawned on me.

Birthday = cake.

DUH!

And since I want to practice on things that are for actual events (and not just for me to stuff my face with), I knew I'd have to make her a cake.

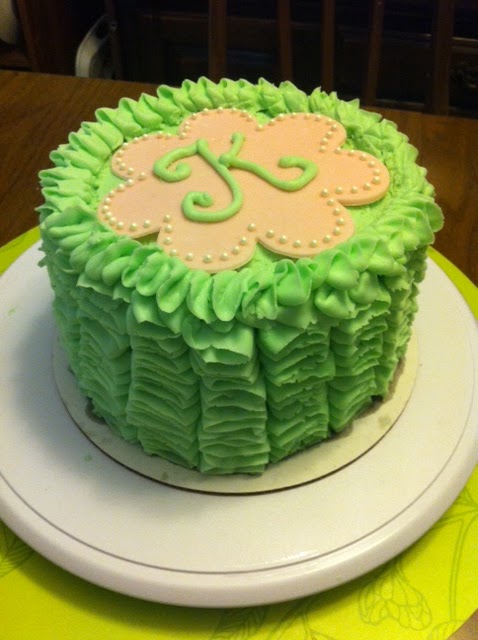
I wanted a mini cake for sure - six inch round - two layer.  I also wanted to do something frilly and girly for her, since she's a girly girl.  So I settled on a vertical ruffle design with a pink velvet cake.

Is it me, or does pink velvet just sound absolutely fabulous?  Pink velvet.  It sounds so girly and chic and awesome.

The secret to pink velvet kids, is that it's pink gel food coloring added to yellow cake mix.  Which is neither chic, nor girly, nor awesome, really.  But you don't have to give away the secret to your cake consumers.

Here's the batter:


My first try was a fail.  I make a few errors - I don't think I greased my new pans well enough, for one thing.  And then I put both pans on one dark 9 x 13 pan, because I thought it would be easier to get them out of the oven.  This was a bad move.  Didn't allow for even cooking, dark pan got too hot, etc etc.

FAIL! (A pretty fail, though . . .)


Shed a few tears and started over.  This time, I decided to dense up the cake using white chocolate pudding.  It added a lovely touch.  I also added white chocolate mocha creamer instead of milk to thin my buttercream.  Yum!

Second set was perfect.  I decided to do a minty green colored frosting and a pink fondant monogram medallion on top.

So -  here is the iced cake with all of it's romantic ruffles.


Closer look:


Next I worked on the medallion.  I cut out a large flower shape with a flower cookie cutter. The fondant is Wilton petal pink.  Another tip I've learned is that just because you don't get a "tool" from the cake decorating section, does not mean that it can't work wonderfully.  Case in point, I poked the holes that would hold my edible pearls with a tool I got from a pumpkin carving kit.  I've also used items from my son's playdough set to work with fondant (fully cleaned of course).  I dabbed a bit of water into each hole with a paintbrush and then set each pearl in by hand.  It still looks a bit wet in the photo.


And then I piped a large green "K" - her initial - on the dried flower (I let it dry for about 3 hours).

Here is my finished product.  She absolutely LOVED it! In fact, she screamed! :)


She didn't cut it until that night and took a pic with her phone, so it's a bit dark.  But here is the cut cake.


Wednesday, August 17, 2011

Post Easter Absurdity

I made these right after Easter, but thought I would post a pic.

We had a few Cadbury eggs left, both mini and the regular sized ones.  And so, after seeing a post on Buzzfeed about things to do with leftover Cadbury eggs, I made this ridiculous concoction.


Behold the Cadbury brownies!

Goodbye diet! Hello diabetic coma!

Wednesday, August 10, 2011

Ravishing Rosette Cupcakes - Chocolate Lover's Edition

Made these over the weekend.  If I'm not baking on a weekend, life just isn't the same. Wishing I had a big project for the upcoming weekend, but I've got zilch.  Guess I'll have to invent one for myself. :)

This little gem is a box chocolate cake mix with mini chocolate chips added to the batter.  I used the remainder of my Nutella buttercream disaster-turned-to-triumph icing to frost.

They were ridiculously good and SUPER chocolately. My five year old son, who is an "icing eater only" ate several in their entirety on Sunday -which was quite a shock.

Brought them to work on Monday and they are long gone.  Sigh.  They were a tasty lot.

I'm thinking raspberry filling next time, yes?


Sunday, July 31, 2011

A Burger Cake for the Burger King

My father is a fan of Burger King - to say the least.  He has eaten lunch at Burger King every single day for the past 2 or 3 years, I'm not sure.  Needless to say, he absolutely loves it.

And so, since his birthday was coming and I had taken up cake decorating, my stepmom commissioned me to make a cheeseburger cake for his 58th.  I've seen the cheeseburger cake in many forms over the years.  In fact, the first time I ever saw one was at my best friend's birthday party in elementary school.  So I'm very familiar with it.  But, I knew it was going to be a bit of a challenge.  Especially since it would be my first attempt at covering cake with fondant. And not just any fondant - homemade rolled fondant that I would make myself.  And I made that choice for two reasons - because fondant doesn't appear to come in the color I was looking for, at least not a bunch of it.  And, although Wilton makes a lovely rainbow of spray colors, they don't make brown or tan. (And an airbrush machine is $300, I believe, so that was absolutely out.)

Step one was lots and lots of research. Studying photos on Google, finding You Tube tutorials, various cake blog descriptions and advice, etc.  I must say that You Tube tutorials have been a lifesaver so far.  I don't even know why people need to go to school for stuff like this anymore. :P  I'm also a very visual learner and since people mostly suck at writing instructions, it's always best for me to watch somebody do something.

Step two - was just to make it work.

Unfortunately, I was sick for the last two days of last week, which meant I spent most of my time in bed.  But somehow, I managed to drum up enough strength on Friday evening to begin baking.  The party was the following evening.

Because I was making a stacked cake covered in fondant (which means it's heavy), I knew I would have to dense up my cake recipe or find a good scratch one.  I learned through online research that it's very simple to dense up a box mix by changing up the recipe a bit and adding instant pudding to the mixture.  So - I densed up yellow cake mix and baked my "buns."  Another ingenious thing I learned online is that a Pyrex bowl is the perfect baking container for the top bun.  So - I utilized my glass Pyrex for the top bun and an 8 inch round for the bottom.  The results were great!


The "burger," I made out of a densed chocolate cake recipe - an 8 inch round.  I wrapped all of the cake layers in several layers of cling wrap and refrigerated them overnight.

Making fondant is a simple but messy process.  Yet, I really feel that it's worth it, considering the same amount of fondant in a store will cost you four or five times the price.  It's just marshmallows, water, powdered sugar and flavoring. That's it. But - you have to have a good stand mixer with a dough hook.  And - even after the dough hook does its work, the work is not done.  You have to knead it for at least 10 to 15 minutes.  The greatest part about it, though, other than the cost, is that you can color it while it's still in the liquid process. And if you've ever seen those bakers on TV painfully kneading color into large lumps of white fondant, you know it's not something you want to mess with if you don't have to.


I also made the buttercream the day before -finally adding creme bouquet flavoring to the mix, which made the buttercream taste as close to bakery style icing as I've ever made.  I was super pleased with it.

Day two consisted of assembly and decorating.  I had another challenge as well.  I had to split and fill two layers of the cake  - the bottom bun and burger patty. I'd never split cake layers before. And my dad requested German chocolate frosting for the filling-the coconut, caramel pecan concoction.  I went with the canned stuff because I know making that stuff is a huge headache.  The issue there was that the frosting is very, very wet and would add a ton of moisture to the cake - not always a bad thing, but that bottom bun wasn't a very thick layer to begin with, so I needed to proceed with caution.

And then I had a misstep - I decided that I would do a nutella buttercream for the patty frosting.  I figured it would be simple - scoop out of some of my fresh buttercream, blend in a container of nutella and voila.

Only there was no voila.

It was a disaster.  It turned into some sort of weird dough like mixture.  I added chocolate milk and brown food coloring.  And mixed and mixed and mixed.  It was weird. It was chewy.  It was almost like a failed fudge.  However, it would have to do.  There was no way I was making more buttercream.  At this point I had already put FIVE POUNDS of powdered sugar into the elements of this cake. Yes - FIVE!!

So, I continued on doing things I'd never done before.  The cake splitting came out perfectly, but I had watched several videos on how to do it right, so I owe it all to those.  I made fondant lettuce, tomatoes and cheese slices out of Wilton fondant that I bought - the pack that comes with the primary colors.  My sis helped me mix up icing ketchup and mustard.  The undyed frosting served as mayonnaise.  And then, I commenced putting it together.

I was super intimidated when it came to the cake covering step.  And my first attempt was a disaster.  The key, crucial thing is - the rolling surface MUST be completely covered in powdered sugar or cornstarch.  Not a little . . .a LOT.  I learned this the hard way.  Every bit of the fondant stuck to the table the first time around, and I had to scrape it off and start over.  We actually used a sifter and sifted a good layer of sugar onto the table.  I rolled it out into a giant circle and it lifted easily. I draped it on the bottom bun and it was easy to smooth. Then, as I've seen so many times in tutorials and on TV, I used a pizza cutter to cut off the excess.  I have to admit, it looked perfect.  Once I had smoothed off most of the powdered sugar, it was great.  And, the cool thing was a bit of powdered sugar wasn't too bad - because sometimes you'll see flour left on your burger buns.

The nutella buttercream worked out better than I could have hoped.  Because of the consistency, it almost had a fondant texture to it which made it hard to dent.  You could touch it and it wasn't tacky and wouldn't come off, so that was awesome.  Top bun process also went very well.  I stacked the bottom bun and patty, then added my lettuce, cheese and tomatoes - just around the perimeter (since that's the only part you'll see). At this point, I decided to add straws for support -yes just regular old drinking straws.  They worked out well.  Then, I gently put on the top bun.  It looked better than I would have imagined.  The last step was to pipe condiments and the sesame seeds on the bun.  I waited for my "seeds" to dry, then dipped a clean finger into powdered sugar and flattened down the seeds for a better look.

Earlier in the week, we'd acquired some Burger King sandwich wrappers and empty fry boxes.  The night before I'd also made a pound cake that I cut up into "fries."  We placed them in the boxes and used the papers to decorate our cake board.

And -voila, here is the result.  I have to say, I'm kind of stunned.  It was everything I could have hoped for.