Another very fun cake to make! Loved doing this and the birthday girl was thrilled.
Especially when we cut the cake to reveal - zebra stripes!!!
Filling was Bavarian. All deco was fondant except for the pink buttercream frosting. And the feathers, of course - were feathers. :)
Showing posts with label birthday. Show all posts
Tuesday, January 31, 2012
Guitar Cake
This is my first guitar cake. I think I would do a few things differently next time, but everyone loved the cake and didn't notice the mistakes.
I used the Wilton guitar pan, but since I love working with fondant, I decided to use all fondant on the top portion of the cake. I hand painted the wood grain, and added other embellishments to the top in fondant. If I would have had more time, I might have added a pick guard. My biggest error was not decorating the fret board! Can't believe I forgot that. And I wish I would have also piped the birthday message in another color, but that brown icing so enraging. I used almost an entire container of gel color and it was still a peanut butter color. :(
The strings are white floral wire. I attempted to pipe them over and over again, but it was a mess each time. Thank God I was piping on fondant - always a "pipe and wipe" situation if you mess up.
Everyone loved it.
I used the Wilton guitar pan, but since I love working with fondant, I decided to use all fondant on the top portion of the cake. I hand painted the wood grain, and added other embellishments to the top in fondant. If I would have had more time, I might have added a pick guard. My biggest error was not decorating the fret board! Can't believe I forgot that. And I wish I would have also piped the birthday message in another color, but that brown icing so enraging. I used almost an entire container of gel color and it was still a peanut butter color. :(
The strings are white floral wire. I attempted to pipe them over and over again, but it was a mess each time. Thank God I was piping on fondant - always a "pipe and wipe" situation if you mess up.
Everyone loved it.
Painted Pottery Cake
I've been brainstorming over this cake for many months. It was for my husband's aunt, who has a deep love for Alcobaca pottery from Portugal. I debated on covering the entire cake with fondant, and painting it, but in the end, decided that doing fondant discs would be the smartest way to go about it. The yellow background worked really well.
Cake was white almond sour cream with buttercream frosting and bavarian filling. All fondant discs were hand painted.
Jiu Jitsu/Kickboxer Cake
This cake was for a boy turning 9. He's very into jiu jitsu and kickboxing, so his mom asked me to do the logo of his dojo as well as some other deco. Cake was basic yellow with buttercream. All decoration in fondant. They were thrilled!
Funny story about the last picture - I had a star for each year he was born, but though he was turning 8. When she told me it was nine, I added that last star on top. :)
Pink and Yellow Princess Cake
I loved this color combo.
Cake is 2 layer white almond sour cream with buttercream filling, buttercream frosting and fondant and gumpaste decorations.
Wednesday, October 19, 2011
The Princess Cake
My most challenging cake yet was the princess cake I made this weekend. It was for my second cousin who was having her 3rd birthday.
The cake was a two tier creation, all in purple, pink and white. Since my cousin wanted fondant and gumpaste elements, I had to being working a week in advance. Actually, I began on Monday night and that gave me plenty of time to complete things. On Monday night, I created the gumpaste bow, which turned out pretty well. I used a mixture of white gumpaste (I bought the mix) and very hot pink Satin Ice fondant. The blend made it a nice color -a bubblegum pink.
The next night I constructed the crown. I read on a website to make two, just in case one breaks, so I made two. Luckily, the first one never broke. This photo was taken after the crowns were dry enough to remove their "stablizers" which turned out to be a vase for one and a can of bread crumbs covered in wax paper for the other. I greased both of these well with shortening before wrapping the crowns around to dry. That way they slipped off easily. The bow is also here as well. I stuffed it with tissue to help it keep it's shape while drying.
I made other elements out of gumpaste and fondant - including small crowns, fondant balls for a border, stars and a scepter for the topper. I painted all of it with a mixture of luster dust and vodka and let it dry for a few days.
I also made a nameplate for the front of the bottom tier. This was a slight challenge because since it was going on a curved cake, I'd have to dry it on a curve. I searched the house looking for something (other than the cake pans) that measured 9 inches around. Luckily, a tin of popcorn my son had worked perfectly. I covered it in wax paper and laid the nameplate on to dry. The name and decoration was done in edible marker.
The cake was just three 9-inch rounds for the bottom and two 6-inch rounds for the top. All was iced in a violet purple frosting. I put all decoration on each layer (minus the crown and scepter) and boxed them up. I would wait to assemble them until the party.
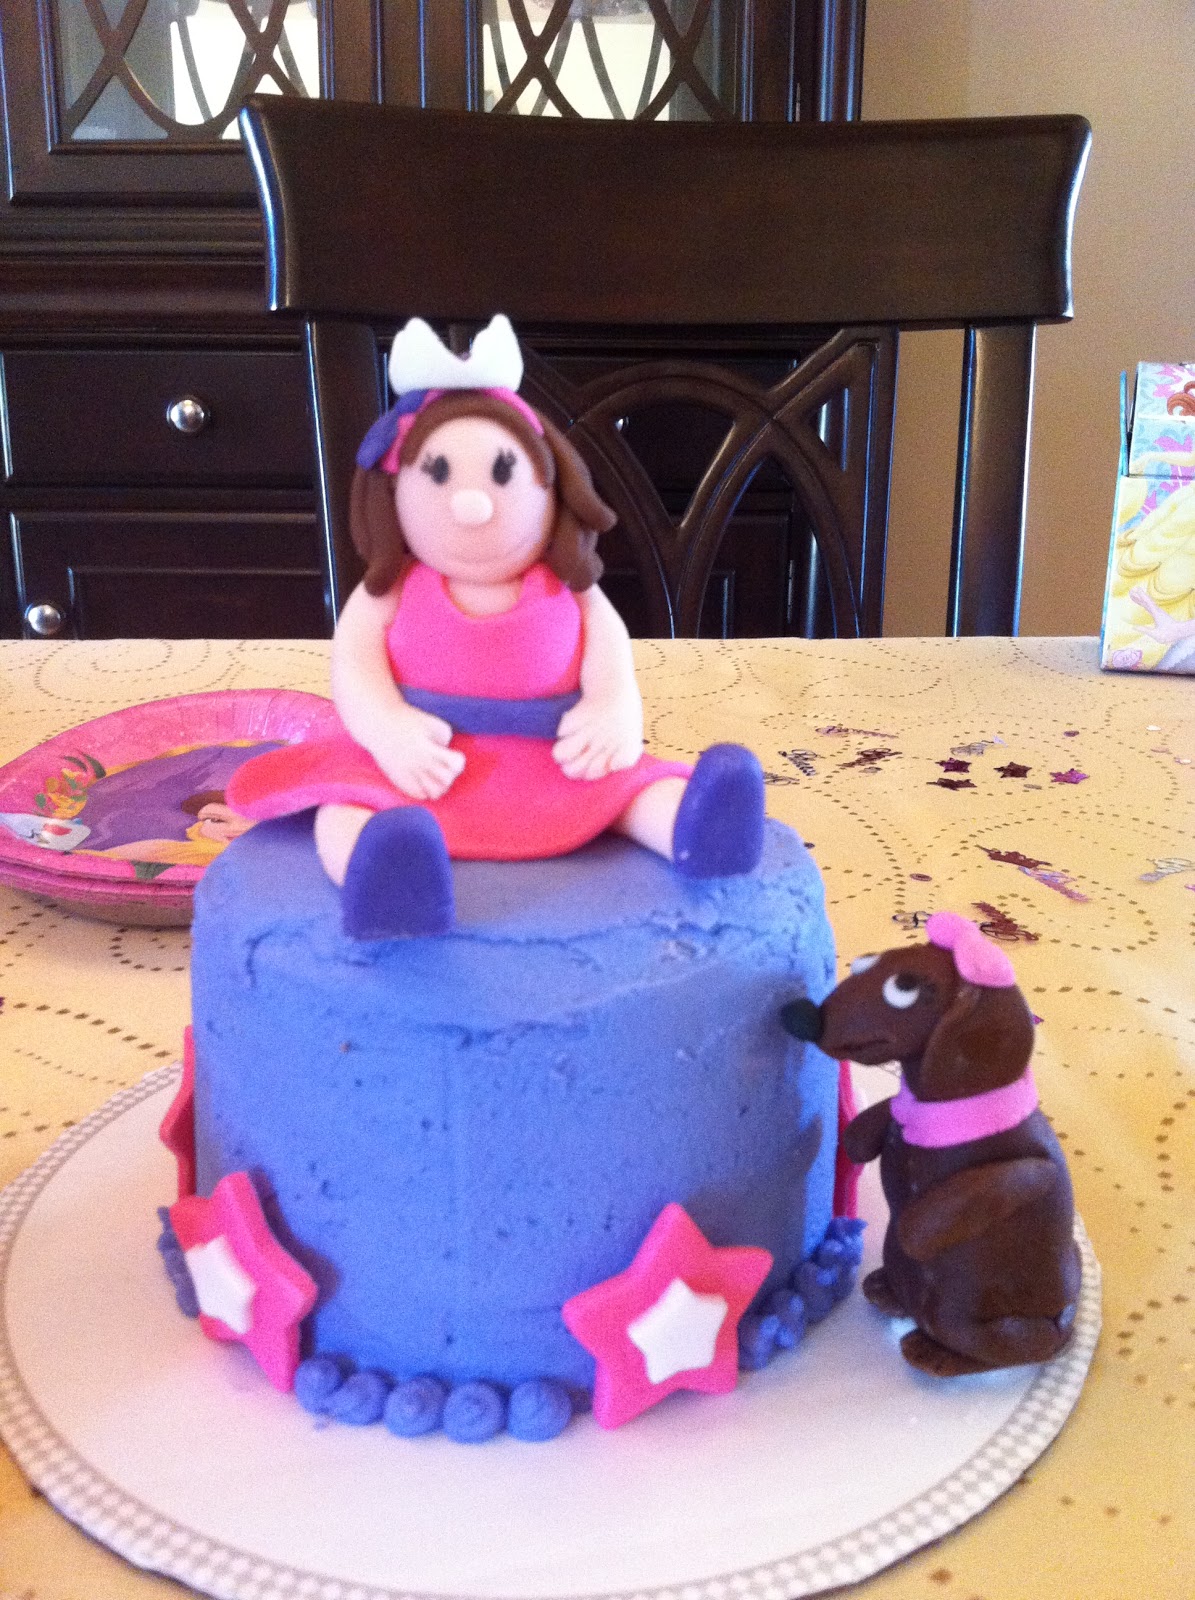
On a whim, I decided to make a figure of the birthday girl. This was my first attempt at figure making, but I'm quite pleased with the results. Unfortunately, as soon as I finished the figure, I realized there was no place for her on the cake anywhere -not the board, the top or the sides. So, I figured I would have to make a mini-cake for the birthday girl where I could put her little figure. After speaking with her grandmother, I learned that she's quite obsessed with their dachshund Missy, so I added a dachshund figure that would stand on the board and "beg" for cake.
Here is the result:
And finally, the Princess Cake. Assembly was quick. The crown went on perfectly, but - the bow was a bit big. This was my first bow attempt, so now I know that I don't need a bow with loops quite as wide for a cake like this. Oh well - it still turned out okay I think.
Other elements on this cake are edible pearls for the crown points that I found at Ross Dress for Less of all places! I love these pearls and have used them over and over. I have them in about 6 colors.
Overall, it turned out very well and my customers were pleased.
The cake was a two tier creation, all in purple, pink and white. Since my cousin wanted fondant and gumpaste elements, I had to being working a week in advance. Actually, I began on Monday night and that gave me plenty of time to complete things. On Monday night, I created the gumpaste bow, which turned out pretty well. I used a mixture of white gumpaste (I bought the mix) and very hot pink Satin Ice fondant. The blend made it a nice color -a bubblegum pink.
The next night I constructed the crown. I read on a website to make two, just in case one breaks, so I made two. Luckily, the first one never broke. This photo was taken after the crowns were dry enough to remove their "stablizers" which turned out to be a vase for one and a can of bread crumbs covered in wax paper for the other. I greased both of these well with shortening before wrapping the crowns around to dry. That way they slipped off easily. The bow is also here as well. I stuffed it with tissue to help it keep it's shape while drying.
I made other elements out of gumpaste and fondant - including small crowns, fondant balls for a border, stars and a scepter for the topper. I painted all of it with a mixture of luster dust and vodka and let it dry for a few days.
I also made a nameplate for the front of the bottom tier. This was a slight challenge because since it was going on a curved cake, I'd have to dry it on a curve. I searched the house looking for something (other than the cake pans) that measured 9 inches around. Luckily, a tin of popcorn my son had worked perfectly. I covered it in wax paper and laid the nameplate on to dry. The name and decoration was done in edible marker.
The cake was just three 9-inch rounds for the bottom and two 6-inch rounds for the top. All was iced in a violet purple frosting. I put all decoration on each layer (minus the crown and scepter) and boxed them up. I would wait to assemble them until the party.
On a whim, I decided to make a figure of the birthday girl. This was my first attempt at figure making, but I'm quite pleased with the results. Unfortunately, as soon as I finished the figure, I realized there was no place for her on the cake anywhere -not the board, the top or the sides. So, I figured I would have to make a mini-cake for the birthday girl where I could put her little figure. After speaking with her grandmother, I learned that she's quite obsessed with their dachshund Missy, so I added a dachshund figure that would stand on the board and "beg" for cake.
Here is the result:
And finally, the Princess Cake. Assembly was quick. The crown went on perfectly, but - the bow was a bit big. This was my first bow attempt, so now I know that I don't need a bow with loops quite as wide for a cake like this. Oh well - it still turned out okay I think.
Other elements on this cake are edible pearls for the crown points that I found at Ross Dress for Less of all places! I love these pearls and have used them over and over. I have them in about 6 colors.
Overall, it turned out very well and my customers were pleased.
Scarlett O' Hara Cake
I was also commissioned to make my mother-in-law's birthday cake last weekend. And since she's a huge fan of Gone with the Wind, I decided to do something based on that theme. I had a few very big ideas, but since the party was going to be pretty small, I decided to do something on a smaller scale. After a few Google image searches, I was inspired to make a doll cake and turn her into Miss Scarlett.
I had to buy the Wilton Wonder Mold pan for this, but I figure I will use it again for other things. I then found a doll which looked as much like Scarlett as was possible. Apparently they don't make doll picks with dark hair and green eyes. And I wasn't about to invest in a full sized Scarlett doll.
Dressing her torso was a bit of a challenge, as I don't sew and wasn't sure how to even begin putting on her "fondant clothing." I wrapped her in fondant, and then cut away the excess. For the ruffly collar, I simply took a circle cutter and cut a few circles. Then I made a hole in the center and gently stretched it with my finger and then over her head. I rippled it where needed. I did three layers like this, stretching them to make them look layered.
For the skirt, after icing the cake, I rolled out strips of white fondant, then placed them onto the cake one strip at a time. I also creased them as needed with the side of my hand and folded under any ragged looking edges. I found that it gave the cake a very nice look.
Once all of the fondant skirt was on, I then took my tiniest paintbrush and with a mixture of vodka and Leaf green gel color, I hand painted all the little botanical elements on her dress. I have to say that it wasn't as bad as I thought it would be. The brush was quite small and so it was fairly easy to do intricate designs.
Finally, I attached the hat and I did use the same green ribbon around her waist. I know that I could have done fondant here, but I was all out of green.
Here she is:
I had to buy the Wilton Wonder Mold pan for this, but I figure I will use it again for other things. I then found a doll which looked as much like Scarlett as was possible. Apparently they don't make doll picks with dark hair and green eyes. And I wasn't about to invest in a full sized Scarlett doll.
Dressing her torso was a bit of a challenge, as I don't sew and wasn't sure how to even begin putting on her "fondant clothing." I wrapped her in fondant, and then cut away the excess. For the ruffly collar, I simply took a circle cutter and cut a few circles. Then I made a hole in the center and gently stretched it with my finger and then over her head. I rippled it where needed. I did three layers like this, stretching them to make them look layered.
For the skirt, after icing the cake, I rolled out strips of white fondant, then placed them onto the cake one strip at a time. I also creased them as needed with the side of my hand and folded under any ragged looking edges. I found that it gave the cake a very nice look.
Once all of the fondant skirt was on, I then took my tiniest paintbrush and with a mixture of vodka and Leaf green gel color, I hand painted all the little botanical elements on her dress. I have to say that it wasn't as bad as I thought it would be. The brush was quite small and so it was fairly easy to do intricate designs.
Finally, I attached the hat and I did use the same green ribbon around her waist. I know that I could have done fondant here, but I was all out of green.
Here she is:
Foo Fighters Drummer Cake
This weekend I was challenged to make THREE cakes! And I took this one on pretty late in the week. However, I must say that it turned out quite nicely.
The recipient is a drummer in a local band and one of the Foo Fighter's biggest fans. So, his wife and I came up with a concept that would include both drums and the FF logo. I found the logo online and created a template for myself. I cut out a six inch circle of red fondant and drew the logo on with edible marker using my stencil to outline it, then filling it in. Once on the cake, I added silver dragees to give it a better look. Although dragees are elegant, they're also pretty rock and roll too, I think.
I made the little drums out of krispy treats and then covered them with fondant. The sides of the drums are marbled fondant made by putting a few drops of black food coloring onto white fondant and not blending all the color in. I used edible marker to make accents on the drums. I made tiny drumsticks out of tan fondant.
Surprisingly, this was my very first sheet cake. I've shied away from them, because I feel like they're more difficult to remove from the pan - being an awkward rectangular shape. I know that they probably seem like the easiest cake there is, but I was intimidated. And, although the cake came out like a dream (thanks to Baker's Joy which IS truly a joy) icing the corners of a sheet cake is a pain! A MAJOR pain! I had so much trouble with it, it drove me insane. Will have to work on that some more.
Will post the other two cakes soon!
Here are the results:
The recipient is a drummer in a local band and one of the Foo Fighter's biggest fans. So, his wife and I came up with a concept that would include both drums and the FF logo. I found the logo online and created a template for myself. I cut out a six inch circle of red fondant and drew the logo on with edible marker using my stencil to outline it, then filling it in. Once on the cake, I added silver dragees to give it a better look. Although dragees are elegant, they're also pretty rock and roll too, I think.
I made the little drums out of krispy treats and then covered them with fondant. The sides of the drums are marbled fondant made by putting a few drops of black food coloring onto white fondant and not blending all the color in. I used edible marker to make accents on the drums. I made tiny drumsticks out of tan fondant.
Surprisingly, this was my very first sheet cake. I've shied away from them, because I feel like they're more difficult to remove from the pan - being an awkward rectangular shape. I know that they probably seem like the easiest cake there is, but I was intimidated. And, although the cake came out like a dream (thanks to Baker's Joy which IS truly a joy) icing the corners of a sheet cake is a pain! A MAJOR pain! I had so much trouble with it, it drove me insane. Will have to work on that some more.
Will post the other two cakes soon!
Here are the results:
Subscribe to:
Posts (Atom)