Saturday, November 12, 2011

Vintage LSU Tiger Cake


Since last Saturday was the "game of the century" against Alabama and we got invited to a party, I decided to do an LSU cake for the event.  I love the vintage LSU tiger and see him all over the place lately, so I decided to tackle him in fondant and edible marker.

It was not as easy as I thought it would be.  In fact, my first attempt was a complete disaster that I angrily crumpled and tossed in the trash.  I then made a simpler design for the top - a paw, but just couldn't stop thinking about how badly I wanted to do the tiger.  So, after a bit of rethinking my process, I gave it another shot and finally got it just how I wanted it.  It's the 1947 LSU Tiger mascot logo.

Here is the throwback/vintage tiger -


Here's my tiger -


Cake was purple velvet


Finished cake - tiger stripes on sides are purple fondant


And the cut cake!

WE WON!!! GEAUX TIGERS!!!!!!!!!!!!!!!!!!!!


Great Pumpkin Cupcakes

Every year, my siblings and I host a very small get together - just us and significant others plus kids - and watch "It's the Great Pumpkin Charlie Brown."  I usually make cupcakes, but since I started decorating, I decided to kick it up a notch this year.

Got this idea on Real Simple, I think - maybe somewhere else. It's simply a circle of white fondant draped over an unwrapped dum dum lollipop.  The eyes are drawn on with edible black marker.  It was easy, but a little time consuming. Decided to make our top cupcake "Charlie Brown" is his overly-snipped ghost costume.  Cupcakes were orange velvet - frosting was chocolate buttercream.  They were great!


Wednesday, October 19, 2011

The Princess Cake

My most challenging cake yet was the princess cake I made this weekend.  It was for my second cousin who was having her 3rd birthday.

The cake was a two tier creation, all in purple, pink and white. Since my cousin wanted fondant and gumpaste elements, I had to being working a week in advance.  Actually, I began on Monday night and that gave me plenty of time to complete things.  On Monday night, I created the gumpaste  bow, which turned out pretty well.  I used a mixture of white gumpaste (I bought the mix) and very hot pink Satin Ice fondant.  The blend made it a nice color -a bubblegum pink.

The next night I constructed the crown.  I read on a website to make two, just in case one breaks, so I made two.  Luckily, the first one never broke. This photo was taken after the crowns were dry enough to remove their "stablizers" which turned out to be a vase for one and a can of bread crumbs covered in wax paper for the other.  I greased both of these well with shortening before wrapping the crowns around to dry.  That way they slipped off easily.  The bow is also here as well.  I stuffed it with tissue to help it keep it's shape while drying.


I made other elements out of gumpaste and fondant - including small crowns, fondant balls for a border, stars and a scepter for the topper.  I painted all of it with a mixture of luster dust and vodka and let it dry for a few days.

I also made a nameplate for the front of the bottom tier.  This was a slight challenge because since it was going on a curved cake, I'd have to dry it on a curve.  I searched the house looking for something (other than the cake pans) that measured 9 inches around.  Luckily, a tin of popcorn my son had worked perfectly.  I covered it in wax paper and laid the nameplate on to dry. The name and decoration was done in edible marker.


The cake was just three 9-inch rounds for the bottom and two 6-inch rounds for the top.  All was iced in a violet purple frosting.  I put all decoration on each layer (minus the crown and scepter) and boxed them up.  I would wait to assemble them until the party.

On a whim, I decided to make a figure of the birthday girl.  This was my first attempt at figure making, but I'm quite pleased with the results.  Unfortunately, as soon as I finished the figure, I realized there was no place for her on the cake anywhere -not the board, the top or the sides.  So, I figured I would have to make a mini-cake for the birthday girl where I could put her little figure.  After speaking with her grandmother, I learned that she's quite obsessed with their dachshund Missy, so I added a dachshund figure that would stand on the board and "beg" for cake.

Here is the result:


And finally, the Princess Cake.  Assembly was quick.  The crown went on perfectly, but - the bow was a bit big.  This was my first bow attempt, so now I know that I don't need a bow with loops quite as wide for a cake like this.  Oh well - it still turned out okay I think.

Other elements on this cake are edible pearls for the crown points that I found at Ross Dress for Less of all places!  I love these pearls and have used them over and over.  I have them in about 6 colors.

Overall, it turned out very well and my customers were pleased.


Scarlett O' Hara Cake

I was also commissioned to make my mother-in-law's birthday cake last weekend.  And since she's a huge fan of Gone with the Wind, I decided to do something based on that theme.  I had a few very big ideas, but since the party was going to be pretty small,  I decided to do something on a smaller scale.  After a few Google image searches, I was inspired to make a doll cake and turn her into Miss Scarlett.

I had to buy the Wilton Wonder Mold pan for this, but I figure I will use it again for other things.  I then found a doll which looked as much like Scarlett as was possible.  Apparently they don't make doll picks with dark hair and green eyes.  And I wasn't about to invest in a full sized Scarlett doll.

Dressing her torso was a bit of a challenge, as I don't sew and wasn't sure how to even begin putting on her "fondant clothing."   I wrapped her in fondant, and then cut away the excess.  For the ruffly collar, I simply took a circle cutter and cut a few circles. Then I made a hole in the center and gently stretched it with my finger and then over her head.  I rippled it where needed.  I did three layers like this, stretching them to make them look layered.

For the skirt, after icing the cake, I rolled out strips of white fondant, then placed them onto the cake one strip at a time.  I also creased them as needed with the side of my hand and folded under any ragged looking edges. I found that it gave the cake a very nice look.

Once all of the fondant skirt was on, I then took my tiniest paintbrush and with a mixture of vodka and Leaf green gel color, I hand painted all the little botanical elements on her dress.  I have to say that it wasn't as bad as I thought it would be.  The brush was quite small and so it was fairly easy to do intricate designs.

Finally, I attached the hat and I did use the same green ribbon around her waist.  I know that I could have done fondant here, but I was all out of green.

Here she is:


Foo Fighters Drummer Cake

This weekend I was challenged to make THREE cakes!  And I took this one on pretty late in the week.  However, I must say that it turned out quite nicely.

The recipient is a drummer in a local band and one of the Foo Fighter's biggest fans. So, his wife and I came up with a concept that would include both drums and the FF logo.  I found the logo online and created a template for myself.  I cut out a six inch circle of red fondant and drew the logo on with edible marker using my stencil to outline it, then filling it in.  Once on the cake, I added silver dragees to give it a better look. Although dragees are elegant, they're also pretty rock and roll too, I think.

I made the little drums out of krispy treats and then covered them with fondant. The sides of the drums are marbled fondant made by putting a few drops of black food coloring onto white fondant and not blending all the color in. I used edible marker to make accents on the drums.  I made tiny drumsticks out of tan fondant.

Surprisingly, this was my very first sheet cake. I've shied away from them, because I feel like they're more difficult to remove from the pan - being an awkward rectangular shape.  I know that they probably seem like the easiest cake there is, but I was intimidated.  And, although the cake came out like a dream (thanks to Baker's Joy which IS truly a joy) icing the corners of a sheet cake is a pain! A MAJOR pain!  I had so much trouble with it, it drove me insane.  Will have to work on that some more.

Will post the other two cakes soon!

Here are the results:


Thursday, September 29, 2011

Dallas Cowboys Cake

So, I finally got my first paying gig. Actually, I take that back.  I was hired to do a gig at Aidan's birthday party but not until October 15th.  This one came up and I have been paid for it, so I guess it's the first cake I've ever gotten paid to do. :)

A coworker saw some of my work and asked me to do a Dallas Cowboys cake for her son.  She pretty much gave me creative free reign - so I did a bit of research and since she wanted an 8 inch round, I decided simple was best.  

I intended to do the Cowboys actual logo in the font, but in the end, I ran out of time.  I knew getting those cookie cutters would make me lazy, but I don't think it detracted from the cake.  This was also my first time working with floral wire and I must say - it was a breeze.  Basically, I just cut out two star shapes for each decorative element and sandwiched them together with the wire in between.  I used a bit of water on a paintbrush to help them stick together. The football is made of chocolate fondant, which tastes just like tootsie rolls, and white fondant accents.

This was my first full assembly -


At this point I realized that I didn't have enough room to write "Happy Birthday Tyrone" on the cake board in front of the cake.  But then - I noticed that I had six stars and that there are exactly six letters in his name. Poifect!  I also needed to somehow show that he was turning 44.  So, after some additional work -


Here are a few additional views


I must say, this cake caused the least anxiety out of all the cakes I've made.  It's also the smoothest fondant free cake I've ever done.  The secret - I found a stainless steel scraper/dough cutter/food chopper at Ross for 2.99.  It's slightly beveled and works like a charm on smoothing the sides.  I also chilled the cake for about 5 minutes then took it back out, pressed wax paper to the sides and went over it again with the scraper - right on top of the wax paper.  It worked out well.

Monday, September 19, 2011

Aidan's First Birthday

My baby boy turned a year old on Saturday.  Since I began decorating, I knew that I would definitely be making his birthday cake and that it would definitely be a two-tiered creation.  I planned this cake for several weeks - did sketches, watched videos, got advice from decorating friends, etc etc.

His theme was owls.  I decided to create a fondant owl topper and other fondant decorations, but would buttercream both layers instead of covering in fondant.  I wanted to do fondant feathers, but figured I might have to hand cut each one.  There was no way I'd have time to do it.  Instead, I bought a leaf cutter and drew lines on each to make it look more feathery.

I also did his name using cookie cutters.  I was going to either freehand his name or use a homemade stencil, but didn't have time.

Made his owl topper, name and feather decorations 2 days in advance to give them time to dry.


The smash cake was made with mini cake pans - 4 inch rounds


And here is the final result.  I couldn't get the buttercream finish as smooth as I wanted it.  But I now know that the icing should have bit a bit thinner in consistency and I should have put much more on the cake.  I also wasn't completely pleased with the color - really wanted a lighter blue.  But overall, I think it came out pretty well for my first attempt at a two tier.


Sunday, September 18, 2011

All You Need is Cake

My brother Jim is a huge Beatles fan.  And so, for his 32nd birthday, I decided to bake him a Beatles birthday cake.  After a bit of internet research, I stumbled across an image of a cake that I really liked - simple, clean, modern, yet pretty impressive looking.  So, I decided to tackle it.  And boy was it something that needed to be "tackled."

The process took nearly a week.  I drew the stencil in Adobe Illustrator, printed on cardstock, cut with an exacto and then put onto black fondant and cut out.  I let the faces dry for two days.  The logo nameplate was done with fondant and edible marker - I used a template for that as well, which I cut out of cardstock.  Other elements are fondant cut with cookie cutters. The "frames" were the most arduous of everything.  They started out too thick, broke like crazy, etc, etc. But in the end, with the help of my mom who was in town, we got them on the cake.

The cake board decoration is actually cup cake cups cut in half and glued to the (terribly messy looking) cake board.  (I'm such a sloppy crumb coater and the board wasn't grease proof.)

This was my first big cake covered in fondant.  I don't know what possessed me to attempt a square cake for the first fondant covering, but let me just say that it is NOT easy.  And that the fondant elements in the corners are very, very strategically placed.

Overall, I think it came out quite well.  Although it's been funny asking people what they see when they first look at the image on top.

Funniest comment yet - "Ummm - a buffalo? NO! Wait! I see John Lennon!"


Wednesday, August 24, 2011

Pink Velvet Romantic Ruffle Cake

On Saturday morning as I lay in bed wondering what I could get my boss for her birthday, it suddenly dawned on me.

Birthday = cake.

DUH!

And since I want to practice on things that are for actual events (and not just for me to stuff my face with), I knew I'd have to make her a cake.

I wanted a mini cake for sure - six inch round - two layer.  I also wanted to do something frilly and girly for her, since she's a girly girl.  So I settled on a vertical ruffle design with a pink velvet cake.

Is it me, or does pink velvet just sound absolutely fabulous?  Pink velvet.  It sounds so girly and chic and awesome.

The secret to pink velvet kids, is that it's pink gel food coloring added to yellow cake mix.  Which is neither chic, nor girly, nor awesome, really.  But you don't have to give away the secret to your cake consumers.

Here's the batter:


My first try was a fail.  I make a few errors - I don't think I greased my new pans well enough, for one thing.  And then I put both pans on one dark 9 x 13 pan, because I thought it would be easier to get them out of the oven.  This was a bad move.  Didn't allow for even cooking, dark pan got too hot, etc etc.

FAIL! (A pretty fail, though . . .)


Shed a few tears and started over.  This time, I decided to dense up the cake using white chocolate pudding.  It added a lovely touch.  I also added white chocolate mocha creamer instead of milk to thin my buttercream.  Yum!

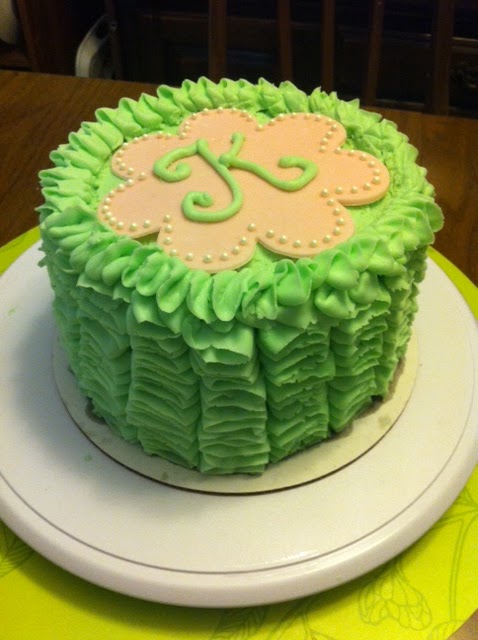
Second set was perfect.  I decided to do a minty green colored frosting and a pink fondant monogram medallion on top.

So -  here is the iced cake with all of it's romantic ruffles.


Closer look:


Next I worked on the medallion.  I cut out a large flower shape with a flower cookie cutter. The fondant is Wilton petal pink.  Another tip I've learned is that just because you don't get a "tool" from the cake decorating section, does not mean that it can't work wonderfully.  Case in point, I poked the holes that would hold my edible pearls with a tool I got from a pumpkin carving kit.  I've also used items from my son's playdough set to work with fondant (fully cleaned of course).  I dabbed a bit of water into each hole with a paintbrush and then set each pearl in by hand.  It still looks a bit wet in the photo.


And then I piped a large green "K" - her initial - on the dried flower (I let it dry for about 3 hours).

Here is my finished product.  She absolutely LOVED it! In fact, she screamed! :)


She didn't cut it until that night and took a pic with her phone, so it's a bit dark.  But here is the cut cake.